Twitter have some awesome tools for saving developers time and boosting productivity. One such tool is Twitter Fabric. Fabric is a collection of tools like Crashlytics (Crash Reporting), Mobile Analytics, Digits and much more.
Sadly, their official SDK’s are not yet available for Xamarin, still, there is a Xamarin binding which works well. Thanks to Michel Moreira for this binding.
This binding is available as Nuget Package, so getting started with this plugin is so easy.
Steps to integrate Digits to your Xamarin.Android app.
Step 1: Get a Fabric Account (https://fabric.io)
Step 2: Sadly, for getting API Keys, you need Android studio. So make sure you have Android Studio Installed (just for the sake of API keys).
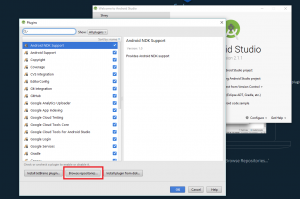
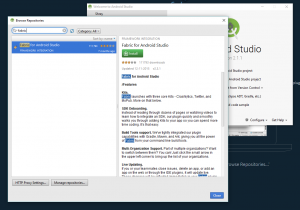
Step 3: In Android Studio, select Plugins-> Browse Repositories -> Search for Fabric Plugin, Install it, Restart the IDE.

Step 4: Start a Blank New Project with the name Intended for your Xamarin.Android project.
Step 5: Click on Fabric Icon in Android Studio, Login to Fabric with your account and select Digits from the kits listed.
Step 6: Create Digits Account, and get the API keys obtained from AndroidManifest.xml file and MainActivity.java.
Step 7: Build the project in Android Studio. Once the app is built from Android Studio, your app gets listed in Fabric Dashboard where you can customize the One Time Password message, and get all they API keys.
Step 8: Enough with Android Studio (make sure you copy the keys from AndroidManifest.xml and MainActivity.java
AndroidManifest.xml
<meta-data
android:name=”io.fabric.ApiKey”
android:value=”your-key-here”
/>
MainActivity.java
|
1 2 |
private static final String TWITTER_KEY = "your-key-here"; private static final String TWITTER_SECRET = "your-key-here"; |
Step 9: Back to our awesome Xamarin, either in Visual Studio or Xamarin Studio. (I use VS)
Step 10: Open your project, Right Click your project in Solution Explorer and Select Manage Nuget Package.
Step 11: Search for Digits by Michel Moreira, and Install the package.
Step 12: Open your activity, in which you want Digits Authentication (in my case MainActivity.cs)
Step 13: Paste the TWITTER_KEY and TWITTER_SECRET TO your MainActivity.cs
|
1 2 3 |
// Note: Your consumer key and secret should be obfuscated in your source code before shipping. private static string TWITTER_KEY = "your-key-here"; private static string TWITTER_SECRET = "your-key-here"; |
Also, paste the meta data information to AndroidManifest.xml under application node.
<application android:label=”Fabric_Demo”>
<meta-data
android:name=”io.fabric.ApiKey”
android:value=”your-key-here”
/>
</application>
Step 14: Initialize fabric in your OnCreate method.
|
1 2 |
TwitterAuthConfig authConfig = new TwitterAuthConfig(TWITTER_KEY, TWITTER_SECRET); Fabric.With(this, new TwitterCore(authConfig), new Digits()); |
Step 15: Inherit your MainActivity from IAuthCallBack and implement the interface. (Which will add two methods namely Success and Failure to your Activity)
|
1 2 3 4 5 6 7 8 9 10 11 12 13 |
public class MainActivity : Activity, IAuthCallback { public void Failure(DigitsException p0) { throw new NotImplementedException(); } public void Success(DigitsSession p0, string p1) { throw new NotImplementedException(); } } |
Step 16: There are multiple ways to authenticate. You can theme your default button or have custom Authentication action from anywhere in the program.
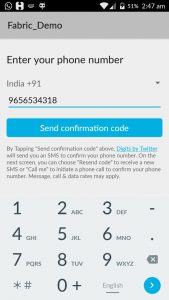
Step 17: For example, you need to authenticate mobile number on a button click, just have Digits.Authenticate(this); in your button click event.
Step 18: If you want to have digits button, add
<com.digits.sdk.android.DigitsAuthButton
android:id=”@+id/auth_button”
android:layout_width=”match_parent”
android:layout_height=”wrap_content” />
in your layout file.
and in your Main Activity, set the callback of the button to the current class.
|
1 2 3 |
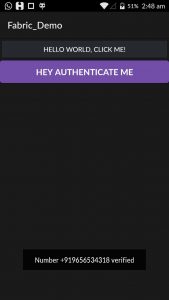
DigitsAuthButton digitsButton = (DigitsAuthButton)FindViewById(Resource.Id.auth_button); digitsButton.Text = "Hey Authenticate Me"; digitsButton.SetCallback(this); |
Step 19: Handle Success and Failure methods. Success method will be called when your authentication using mobile number if verified and it will have the details in DigitsSession p0 variable or p1 gives the mobile number. Failure method will be called if the number cannot be authenticated or User cancels the process.
|
1 2 3 4 5 6 7 8 9 |
public void Failure(DigitsException p0) { Toast.MakeText(this, "Unable to verify you!", ToastLength.Long).Show(); } public void Success(DigitsSession p0, string p1) { Toast.MakeText(this, "Number " + p0.PhoneNumber + " verified", ToastLength.Long).Show(); } |
Step 20: Run and see it in action.

Skip Step 1 to 10 by requesting Twitter Fabrics team a Xamairn plugin 🙂 https://twitter.com/fabric
Shout out your suggestions, feedback and doubts in comment section below.
The Fabric Demo Solution can be downloaded from my Github
Credits: Michel Moreira‘s Fabric Binding for Xamarin.