Elegant Tabs and Rg.Popup for the Fancy UI World

This blog post is part of Xamarin UI July by none other than super awesome Steven Thewissen

Don’t forget to read all other posts to sharpen your Xamarin UI Skills

Introduction

Recently our designers gave our Xamarin Mobile team a hard time to implement a fancy UI paradigm with TabbedPage.
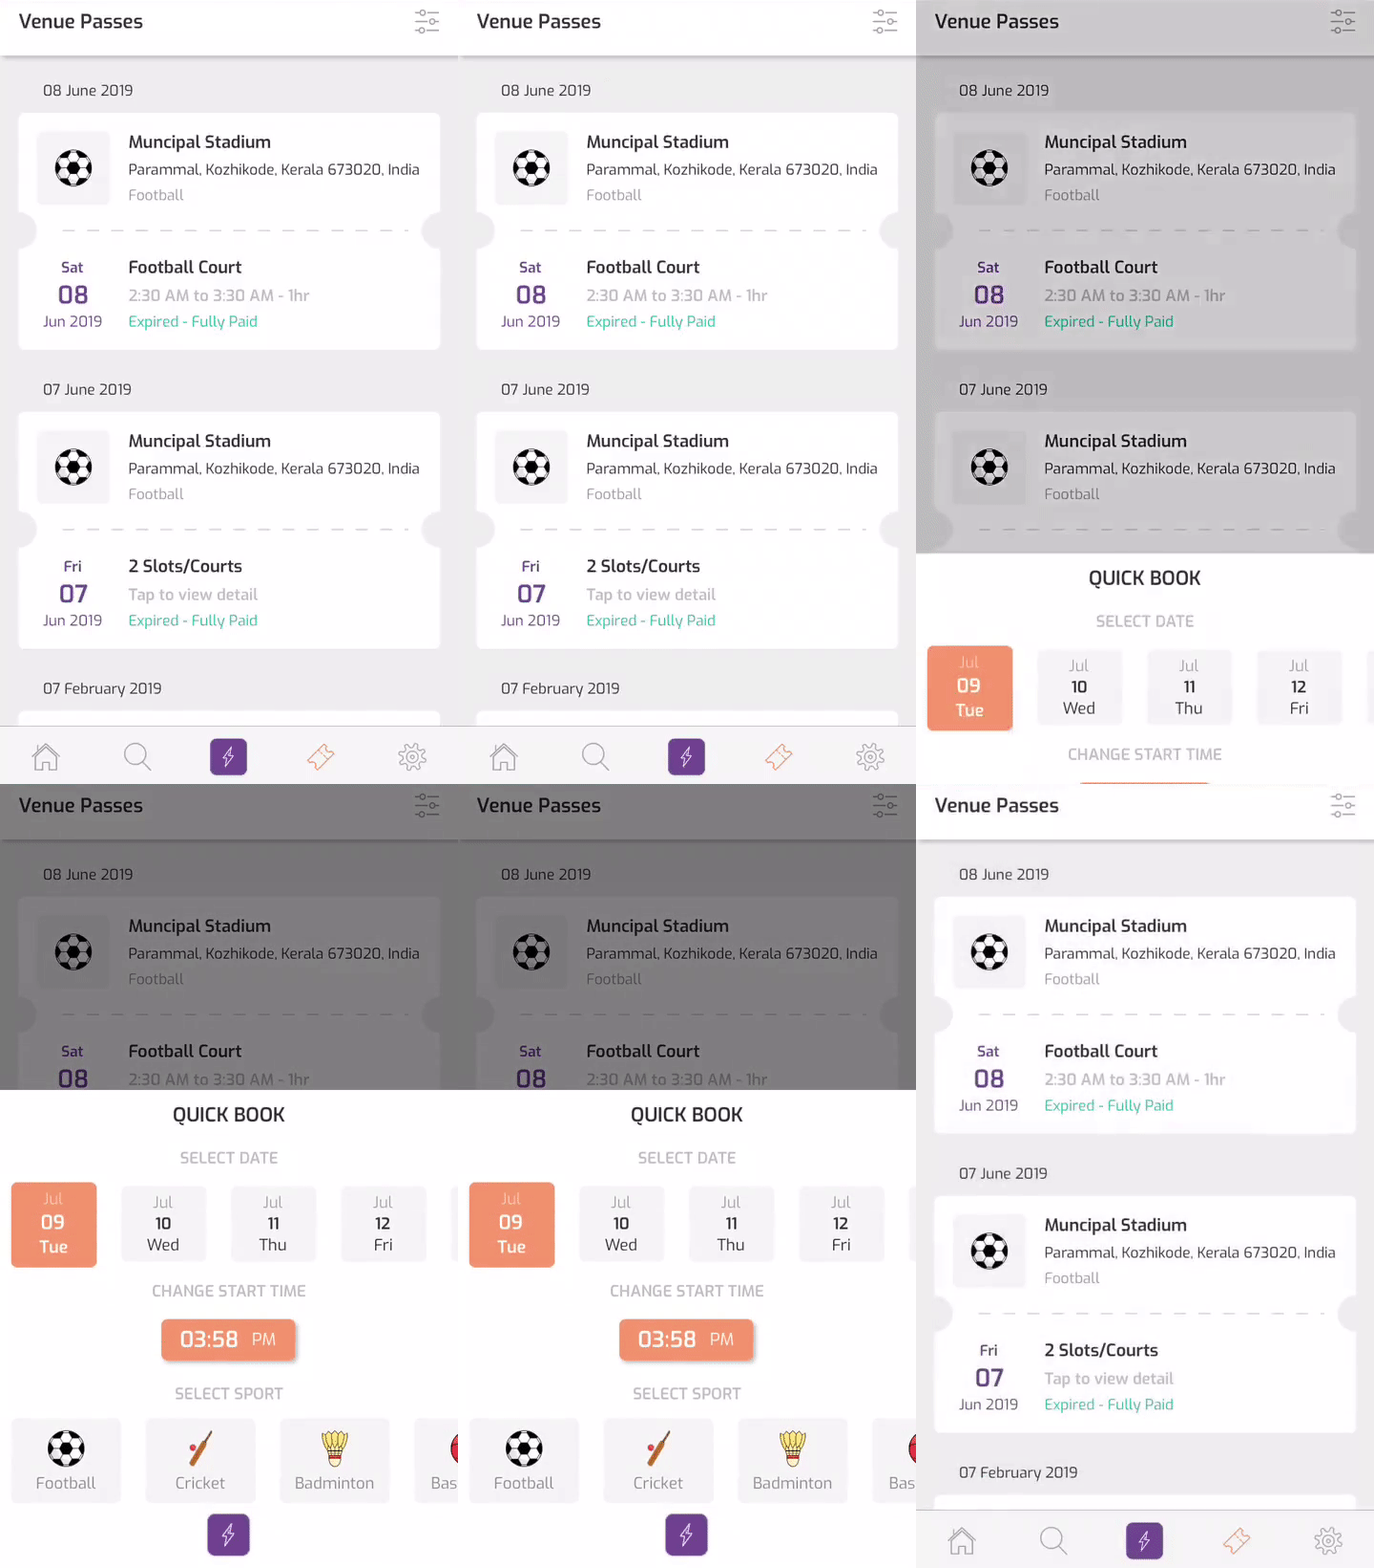
The center tab icon should open popup instead of another tab page.

The concept was simple and nowadays seen in many of the mobile application.

Challenges Faced

The challenge was with the implementation using Xamarin Forms because

  • Xamarin Forms does not have out of the box BottomSheet solution.
  • TabbedPage Tabs have no customisation or their Clicks could not be overridden without Page Navigation.

My initial research were based on how to customize the TabbedPage tabs to avoid Page Navigation on Specific Tab. But after lot of research the solution was either to completely create a custom Tabbed Control or Custom Renderer the Xamarin Forms TabbedPage.

Solution

I chose the custom renderer route, built a plugin called ElegantTabs to meet my needs.

ElegantTabs helped me to defer the click for specific tab items by applying

in the TabbedPage Children Tab Items

ElegantTabs helped me to solve other problems like Removing the titles with Tab Icons, give custom selected and unselected icons.

I accessed the Tab Icon click events by subscribing to

and in the event handler, I check the tab index for implementing appropriate action of calling PopPage.

The other challenge was how to introduce the bottom sheet with its own instance based on the center tab click.

Research gave me multiple options like Custom Controls with help of PanGestureRecognizer, SlideOverKit and Rg.Plugins.Popup

I chose Rg.Plugins.Popup because it met my needs of separate ViewModel instance for the BottomSheet.

It also integrates with Xamarin Forms Navigation, so any new Popup is invoked with

Even though the plugin is actually a popup control, not an actual replacement for BottomSheet, with the customization offered by Rg.Plugins.Popup, I was able to emulate the action of bottom sheet.

I used move animation inbuilt with Rg.Plugins.Popup to emulate slide over.

Summary

This was an interesting challenge for our development team, even though after our initial implementation, there were other approaches for the same problem blogged by the awesome Xamarin Community Members.

I am listing few of them here

Sample Project with our implementation can be found in my GitHub
https://github.com/muhaym/CustomTabAction

ElegantTabs can be found at https://github.com/muhaym/ElegantTabs, with clear documentation about the capabilities offered by ElegantTabs.

Feel free to contact me in case of doubts, clarification & better solutions and enhancements.

Thanks to our company Fantacode allowing us to invest time in this opensource solution.
Custom Switch in Xamarin Forms

Xamarin Forms is a wonderful ecosystem to develop cross platform mobile applications.

Like any platforms, it has limitations too, but yeah there are work arounds. At times you simply can contribute to the awesome “Open Source Xamarin Forms”

Today we will be discussing a small problem I faced in one of our projects, where Xamarin Forms Switch control fires “Toggled” event both when changed by user or programmatically. This was not ideal for our requirements.

So I planned to create a Custom Switch over the Original Switch.

Warning: This work around might not be the best way to do this.

To get started create a Class File, in my case “CustomSwitch”, inherit it from Switch class of Xamarin Forms.

We will create a IsCustomToggled property (which is Bindable Property), to use instead of IsToggled and CustomToggled instead of Toggled event.

Once we reach the constructor, we subscribe to the original Toggled event with our own function.

Also whenever IsCustomToggled is changed in code / program, we will Unsubscribe before setting original IsToggled, and then subscribe back to the event.

The CustomToggled event has CustomToggledEventArgs which contain the new value for switch and an bool “isUser” for indicating whether the action was result of user interaction or code change.


Once the Custom Switch is ready, the usage at any place in project is straight forward,

from Xaml


Samples and CustomSwitch available at GitHub

Hope this helps someone with same issue, in case of any queries do drop a mail to muhaymin at fantacode com where I am available Xamarin Consulting  or use the comment section below.


Upgrading PCL Xamarin Forms Project to .NET Standard Like a Boss

Sorry readers, running own company possess great challenges, so didn’t do justice to my blog, and when I get free time I use it for sleeping :D.

Recently I had to port our existing Xamarin.Forms Project from PCL to .NET Standard.

It’s not a simple Xamarin Forms project, for upgrading simple projects, we have various blog post covering those. I am taking about Xamarin.Forms project of very large scale (around 100k Lines of Code, more than 500 Views &ViewModels,  multiple custom renderes and around 90+ Nuget Libraries).

So all the libraries we used didn’t have support for .NET Standard. So we have multiple requirements here

1. Upgrade our PCL without affecting Git History

2. Keep using Libraries which don’t have .NET Standard support yet.

3. Make sure that your Resx file works as expected. (This I am still experimenting, will be sharing findings).

So the first step you have to make sure is take a copy of your working project in current state and keep it somewhere safe.

If you use git / version control, create a branch and let’s start tinkering with the project. Steps are pretty straight forward.

1. Unload your PCL project (right click -> unload), and start editing it (right -> click edit), VS Mac users, just use Visual Studio code, it’s straight forward.

2. You have to delete everything in the .csproj and insert


So in .NETStandard approach, there is no packages.config. References included in .csproj So you have to move all the stuff in packages.config to your .csproj.

In my case manually changing the to the new format was time consuming for 90+ Nuget Reference I had, so I wrote a simple C# Console application to make my life easier, sharing it here 😀

3. Delete AssemblyInfo.cs, these informations will be in .csproj and packages.config (also in csproj via PackageReference)

4. Basically Reload the project, you are ready to go. But there is catch if your project contains libraries which don’t have .NetStandard.

So we will need to add FallBack criteria for Nuget restores.

Under Property Group add this line (based on you requirements of which previous PCL profile do you want restores to based on)

Other issues you may face is that if you have any references to Microsoft.Bcl.Build nugets in any of your projects (Platform Specific and the new .NET Standard), remove those references.

To avoid possible issues, it is always better to remove the existing PCL reference from Platform Specific Projects, and adding it again.

Points to take care for avoiding potential crashes.

  • If  you are were using Embedded Resources in your PCL project, you have to mark the Build actions again. Otherwise those resources wont load.
  • If you are using Resx for localization, it’s always best to remove the current file (ofcourse take a backup), add one again with same name and replace contents.

Before Building, clean all bin/obj folders, Rebuild the project with fingers crossed :D.

If you face any issue please don’t hesitate to contact me or I can help you with this, Just mail to muhaymin at fantacode dot com

Do share your experiences.

References:

How to Convert PCL Library to NET Standard and Keep Git History – James Montemagno


Blindsist – Assisting Visually Impaired People using IBM Bluemix Visual Recognition

This blog post will cover how I developed Blindsist app for Xhacknight.

The app was developed using Xamarin.Forms, targeting 3 major platforms (iOS, Android and Windows Phone) same time.

Blindsist is a simple one page application. Objective of the application is taking a photo using Smartphone, The photo is then uploaded to IBM Bluemix using REST Api. IBM Bluemix returns the data in Json format, which will be parsed and spoken out using Native Text to Speech services.

Open a new Xamarin.Forms Portable Class Project.

Right click on the Project Blindsist (Portable), click Add new Item, Select Forms Xaml Page, name it ScanPage.xaml

Update the XAML content in ScanPage as below

What it basically does is create a Button Called “ScanButton” which on click trigger event handler called “ScanButtonClicked”.

Let us look to ScanPage.xaml.cs for C# code!

In the constructor ScanPage() write following Code.

For this to work, we have to add a awesome library developed by JamesMontemagno.

It can be found here https://www.nuget.org/packages/Xam.Plugins.TextToSpeech/

To install, right click project, Manage Nuget Package, Search for Xam.Plugins.TextToSpeech, install it in every individual projects.

So when the app starts up, It starts speaking introduction to visually impaired user.

Next is adding Button Clicked event. Just copy this code in your ScanPage.xaml.cs

Now right click your Portable class project, right click, add new item. Add new class file, name it Library.cs

Add following data members.

Now add a Member function GetImage() for Getting Image from Camera, The specialty of coming code is that it works in all 3 platforms with single code. Thanks to another library, which is available in Nuget. Search for Xam.Plugin.Media and install in every projects.

It will check whether Camera is available, if not available return a null object with error message embedded.

Else it will create a file, takes a photo from Camera and store as byte[] format, if file is OK, it returns the Image, with Image Url, and Image in byte[] format.

Now add a member function ProcessImage() to process the image by sending to Bluemix Watson Service.

Each line is commented for understanding what happens there. Atlast we get string bb with Json formatted data from IBM Bluemix with possible results in order of priority.

Now revisit ScanPage.xaml.cs, We have to add “GetPicture()” function on button click. Copy the following code.

Now string temp has the json data, we have to parse it to get the results. Add new class file called Classify.cs in PCL project.

Using http://json2csharp.com we can generate class required for parsing json data from IBM Bluemix service.

To parse json data, again there is a good library called NetwonSoft.Json, obtain it from Nuget, and add it to all projects.

Now we need a simple function to perform deserializing json data.

Create a static class Operations, and a function GetMatch()

Now back to ScanPage.xaml.cs, We have temp ready with Json string. Just pass it to Operations.GetMatch() to get the required data back. Add following codes to where you stopped earlier.

That’s all.. Try Building and running the project. If you face any errors it might be due to not adding Nuget Package mentioned in this post for all projects, or some other errors. Feel free to ask. Together we can build this project to perfection.

The project is in github, https://github.com/muhaym/Xamarin.Forms-Blind-Assist

Feel free to fork, modify, report errors, ask doubts and do whatever you want with the project for the sake of learning.

Please assist me to add Image Compression, because the image upload to Watson Service and getting response back is taking hell of time now.


How to develop a Xamarin.Forms Hello World Application – Xamarin.Forms Series Part 1

Xamarin.Forms a quick Introduction

Today, we will learn how to develop a cross platform Hello World application using Xamarin.Forms.

Xamarin.Forms is not the final word for Cross platform Mobile app development. It is best for getting started with Xamarin, and targetting 3 major platform by sharing 99% Code.

Xamarin.Android or Xamarin.iOS is best for application dealing with high device specific API  usage like geolocation, and other such capabilities. Through Xamarin.Android or Xamarin.iOS a C# developer can share the business logic among Projects and design Native UI’s and make use of Device specific capabilities for 3 platforms independently.

Xamarin.Forms on other hand can be used for simple application where there is less Platform specific API usage.

Xamarin.Forms is great for prototyping or making a quick prototype application. And after you’ve done that, you might just find that you can continue using Xamarin.Forms features to build the entire application.

Hello World using Xamarin.Forms

To get started you must have Installed latest version of Xamarin, I am using Visual Studio for developing the Hello World application so that I can target 3 platform. But I wont be showing iOS screenshots because I don’t have an Apple device in my network. But don’t worry, all the implementations we do here will hopefully work in iOS device.

Hello World! The first application you probably create when you learn new language or start using new development tool.

I am not covering everything in detail, like the basic C# concepts, or Xamarin.Forms complete capabilities.  This tutorial is intended for Getting started with Xamarin.Forms, everything in detail can be learned from Creating Mobile Apps with Xamarin.Forms Book Preview 2 by Charles Petzold http://www.microsoftvirtualacademy.com/ebooks#9780735697232

Open Visual studio, and Create new project.

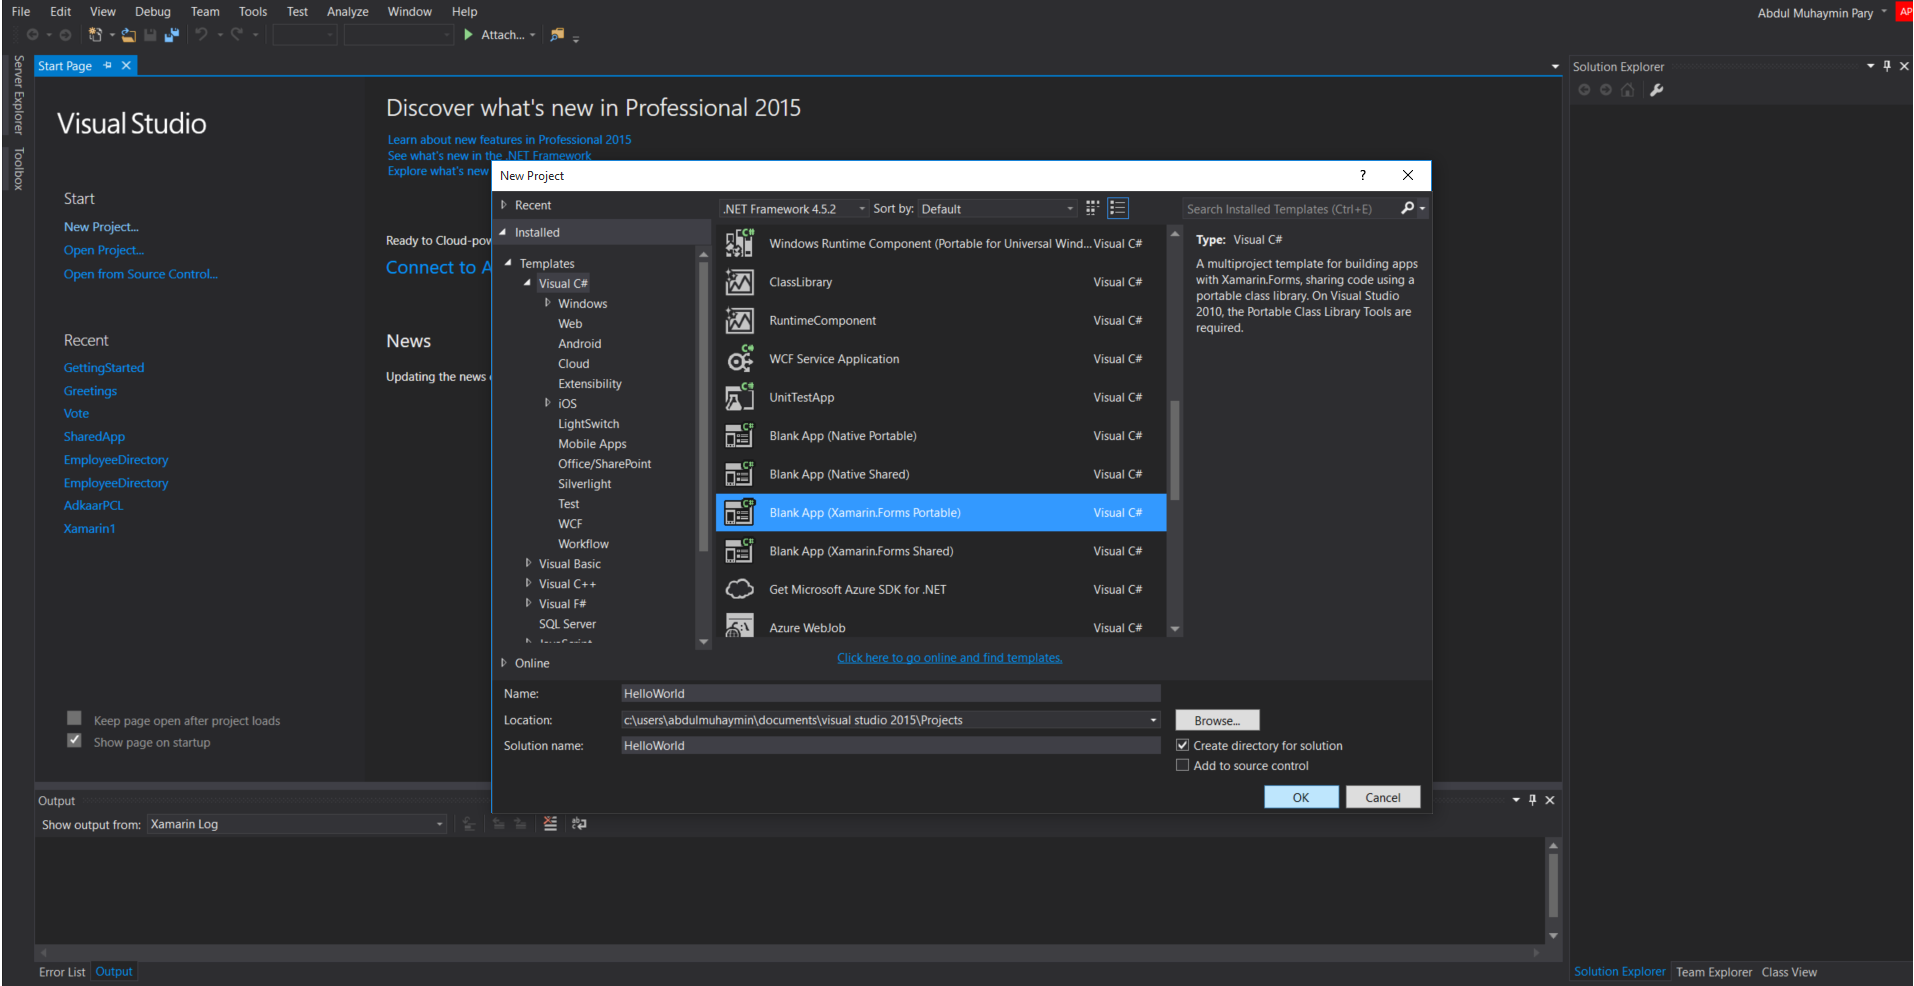
Select Xamarin.Forms Portable Class Library Project (PCL).  As Xamarin Documentation suggests to go for shared if our Project contains XAML (Extensible Markup language, usually pronounced Zammel), in which we will be developing from now on.

For Xamarin.Forms solutions that contain XAML, we recommend using the Xamarin.Forms Portable Class Library (PCL) template rather than using Shared Asset Projects (SAP). The PCL approach isolates Xamarin.Forms code in a separate DLL, while the SAP shares code directly among the three platforms. Before using XAML with the Shared Asset Project (SAP) template read the details below on enabling experimental XAML support in SAPs.

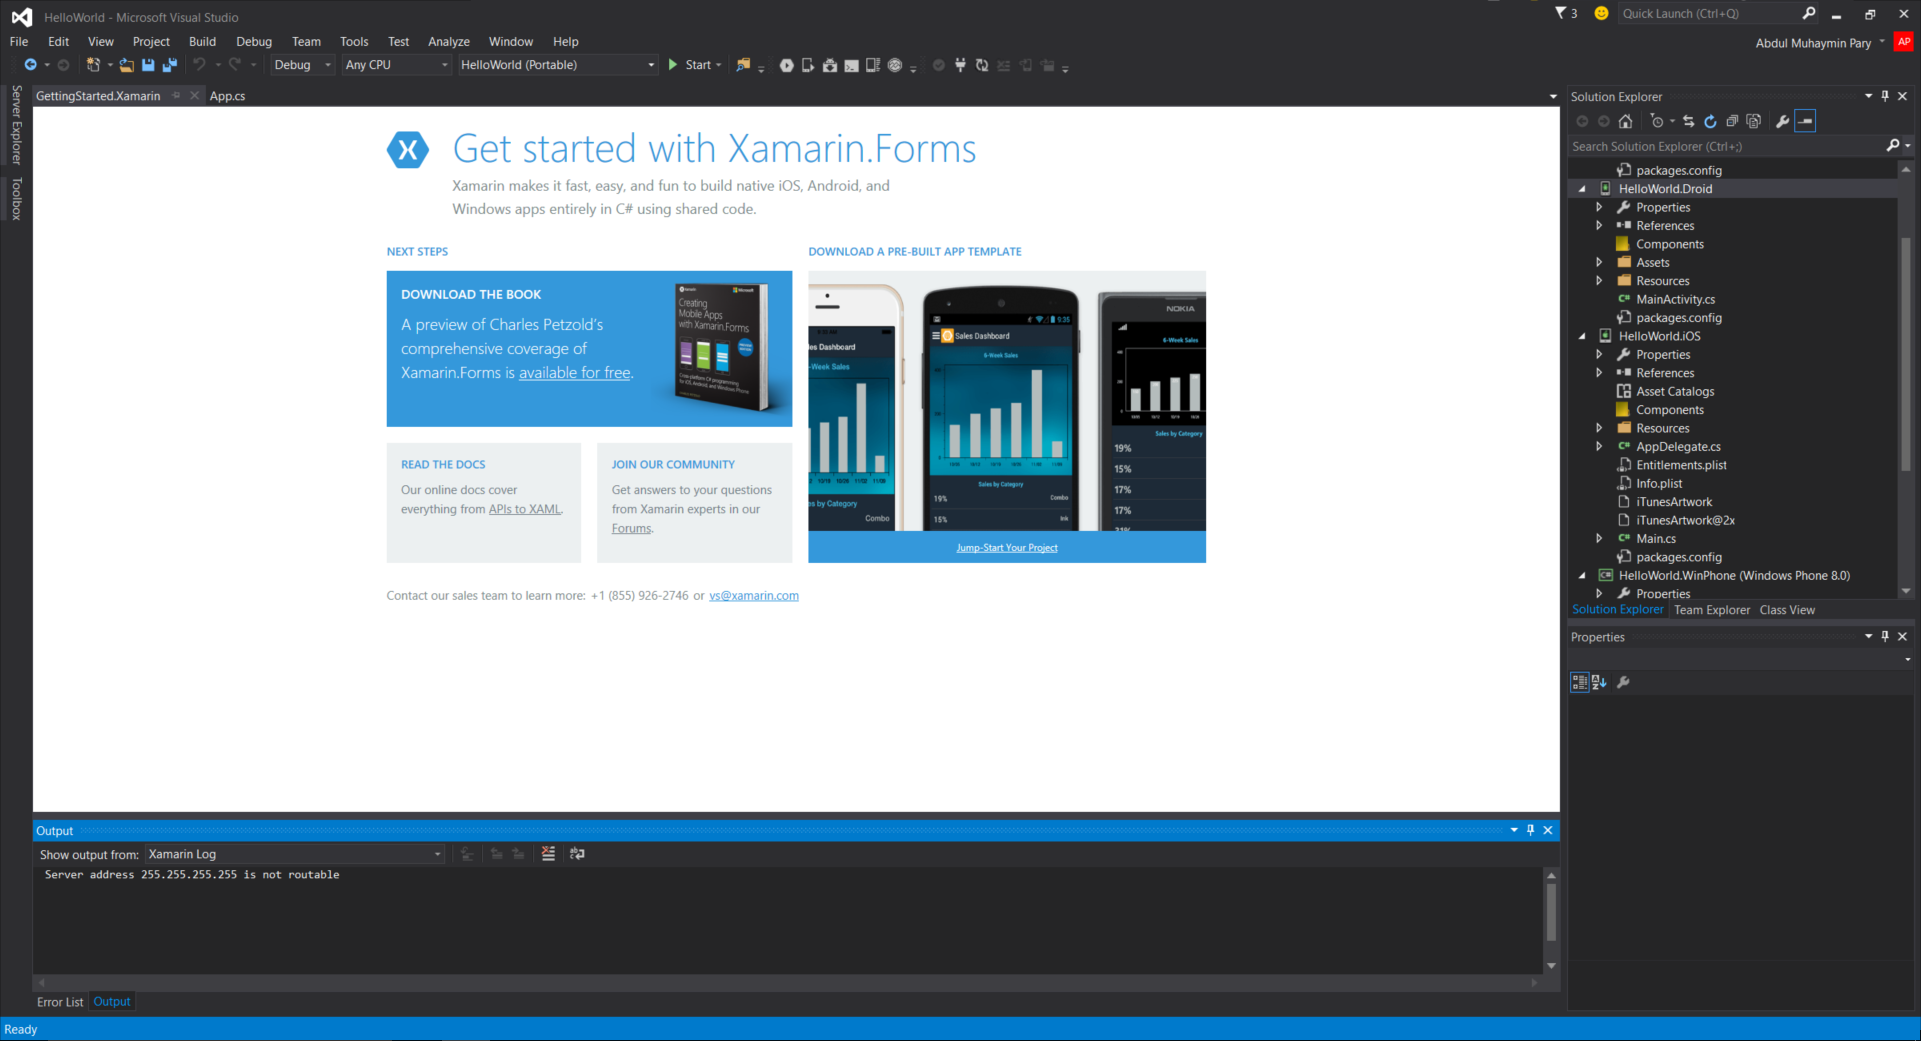
Xamarin.Forms PCL New Project in VS2015
Create Xamarin.Forms PCL New Project in VS2015.

Xamarin.Forms Projects

The Xamarin.Forms Blank template will set up projects for iOS, Android and Windows Phone 8.0. Feel free to delete any project if you are not going to target it.

Right click the solution, click Build Solutions and Run the project in platform of your choice by setting startup project.

Hint for beginners: Startup Project can be changed by right clicking desired Project in Solution, and Selecting “Set as startup project”.

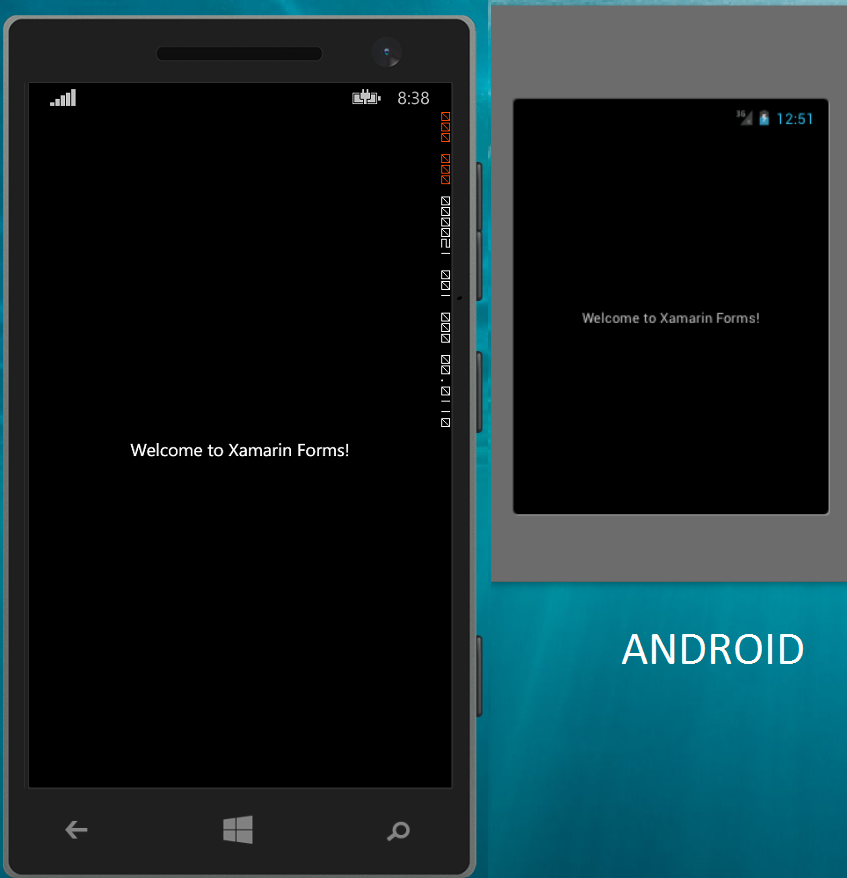
Screenshot with Blank Template

You can see that app is generated as above screenshot.

Now let us dig deep, so we can understand what is happening.

Each Projects in the solution has

  1. iOS – AppDelegate.cs
  2. Android – MainActivity.cs
  3. Windows Phone – MainPage.xaml.cs

These three files are the starting points of respective platforms. All these files contain a line

Here HelloWorld is our Project Shared, App is the entry point (App.cs) in our PCL Project.

This line invokes the App.cs in the main HelloWorld Project which is where we write code to Share among three platform, which contains

MainPage is the entry point of your app, the first page displayed in app. Why I love programming with help of XAML is that I can write the complex parts like the new ContentPage{ … part in above code in more understandable form.

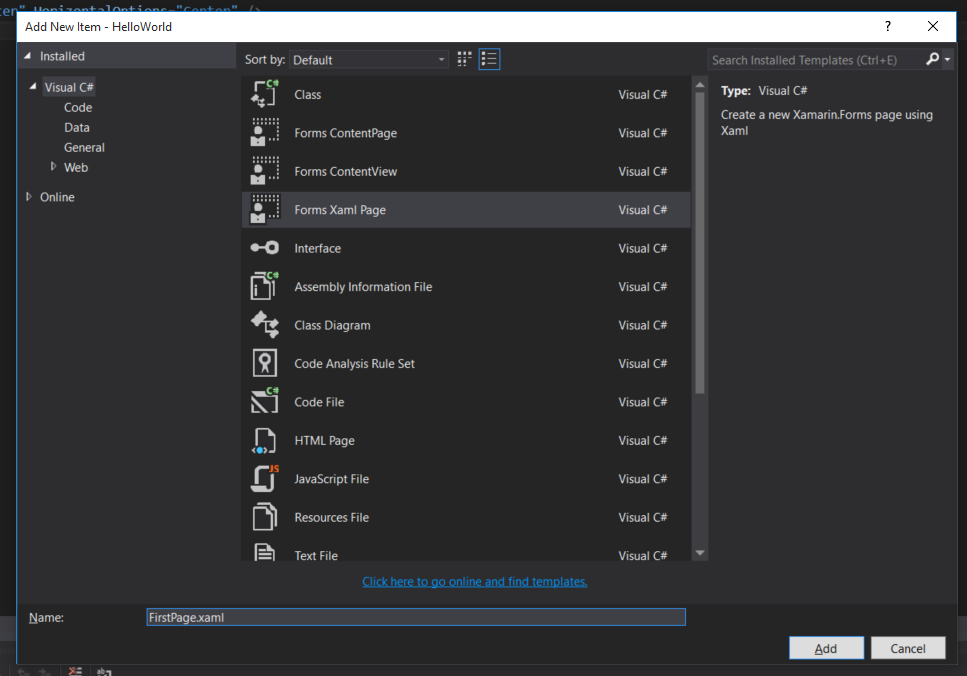
So We just want to create a new entry page. Right Click HelloWorld (Portable) Project, Click Add new Item.

Select Forms Xaml Page, and give it a name FirstPage.xaml. We will use this project as continuation for next tutorial in the series, navigation of pages in Xamarin.Forms.

addnewitem

In FirstPage.xaml, write the code as below

<?xml version=”1.0″ encoding=”utf-8″ ?>
<ContentPage xmlns=”http://xamarin.com/schemas/2014/forms”
xmlns:x=”http://schemas.microsoft.com/winfx/2009/xaml”
x:Class=”HelloWorld.FirstPage”>
<StackLayout VerticalOptions=”Center” HorizontalOptions=”Center” >
<Label Text=”I love XAML” />
</StackLayout>
</ContentPage>

Now we will compare with the first set of code we wrote (or was there in default in App.cs).

new ContentPage { is a main node <ContentPage> in xml format

new StackLayout { is a child node <StackLayout> under <ContentPage>

new Label { is again a child node <Label> under <StackLayout>.

In my view this is simpler than coding it in C#. You can code in the way you want.

Now we want this FirstPage.xaml loaded in startup. Just a small changes in App.cs will get it done.

and comment out the rest of part so that you can compare and study.

Now Build the project and run again.

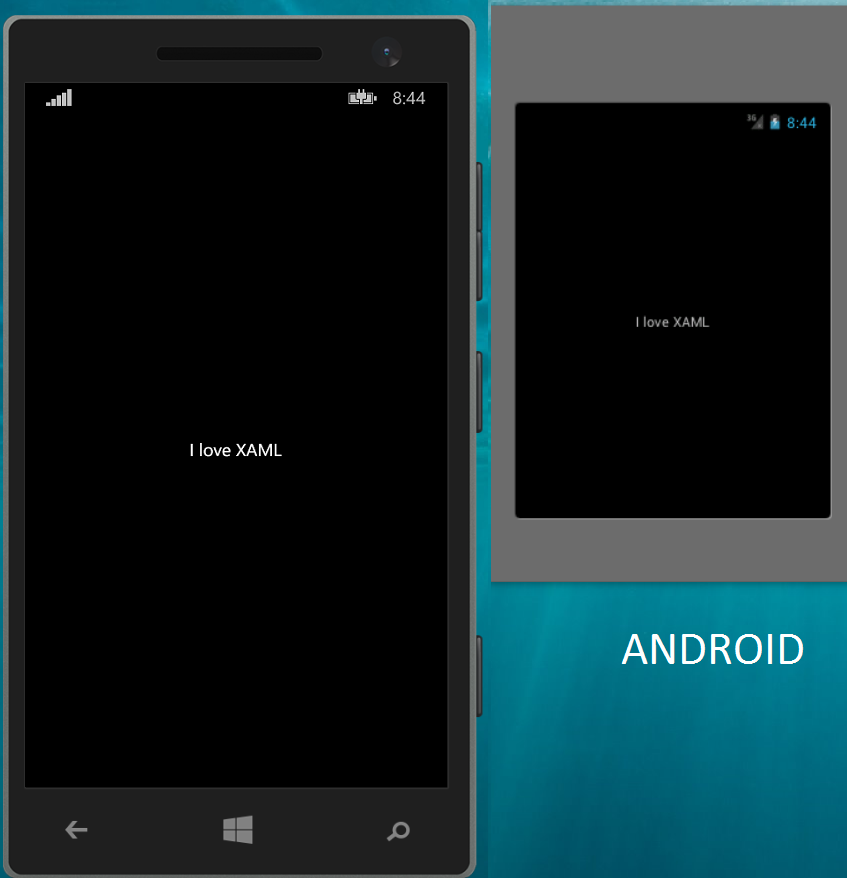
Voila! The new Xaml Page loads in startup.

HelloWorldFinal

So in our First Series, we have learned bit more than a simple Hello World app.

We covered

  1. Creating Xaml.Forms New PCL Project.
  2. Building it and Running.
  3. Coding UI in C# and XAML.
  4. Loading any Xamarin.Form Page as MainPage.

Shout out your suggestions, feedbacks and doubts in comment section below. To be frank this is the first time I am writing tutorial, so your suggestions will help me improve my self.

The HelloWorld Solution can be downloaded from my Github (not a good Project to share, still you guys can fork it and start building on it in case of any issues)

https://github.com/muhaym/Xamarin.Forms.HelloWorld