This blog post is part of Xamarin UI July by none other than super awesome Steven Thewissen

Don’t forget to read all other posts to sharpen your Xamarin UI Skills
Introduction
Recently our designers gave our Xamarin Mobile team a hard time to implement a fancy UI paradigm with TabbedPage.
The concept was simple and nowadays seen in many of the mobile application.
Challenges Faced
The challenge was with the implementation using Xamarin Forms because
- Xamarin Forms does not have out of the box BottomSheet solution.
- TabbedPage Tabs have no customisation or their Clicks could not be overridden without Page Navigation.
My initial research
Solution
I chose the custom renderer route, built a plugin called ElegantTabs to meet my needs.
ElegantTabs helped me to defer the click for specific tab items by applying
|
1 |
plugin:Transforms.DisableLoad="True"; |
in the TabbedPage Children Tab Items
|
1 2 3 4 5 6 |
<TabbedPage.Children> <views:ItemsPage Title="Browse" IconImageSource="tab_feed.png"/> <!--Empty Content Page to Facilitate Popup Tab--> <ContentPage IconImageSource="quick_book.png" Title="Hello" plugin:Transforms.KeepIconColourIntact="True" plugin:Transforms.DisableLoad="True" plugin:Transforms.HideTitle="True"/> <views:AboutPage Title="About" IconImageSource="tab_about.png"/ </TabbedPage.Children> |
ElegantTabs helped me to solve other problems like Removing the titles with Tab Icons, give custom selected and unselected icons.
I accessed the Tab Icon click events by subscribing to
|
1 |
Transforms.TabIconClicked += Transforms_TabIconClicked; |
and in the event handler, I check the tab index for implementing appropriate action of calling PopPage.
|
1 2 3 4 5 6 7 8 |
async private void Transforms_TabIconClicked(object sender, ElegentTabsEventArgs e) { if (e.selectedIndex == 1) { await Navigation.PushPopupAsync(new PopupPage()); } } |
The other challenge was how to introduce the bottom sheet with its own instance based on the center tab click.
Research gave me multiple options like Custom Controls with help of PanGestureRecognizer,
I chose Rg.Plugins.Popup because it met my needs of separate ViewModel instance for the
It also integrates with Xamarin Forms Navigation, so any new Popup is invoked with
|
1 |
Navigation.PushPopupAsync(new PopUpPage()); |
Even though the plugin is actually a popup control, not an actual replacement for
I used move animation inbuilt with Rg.Plugins.Popup to emulate slide over.
|
1 2 3 4 5 6 7 8 9 10 11 12 13 14 15 16 17 18 19 20 21 22 23 24 |
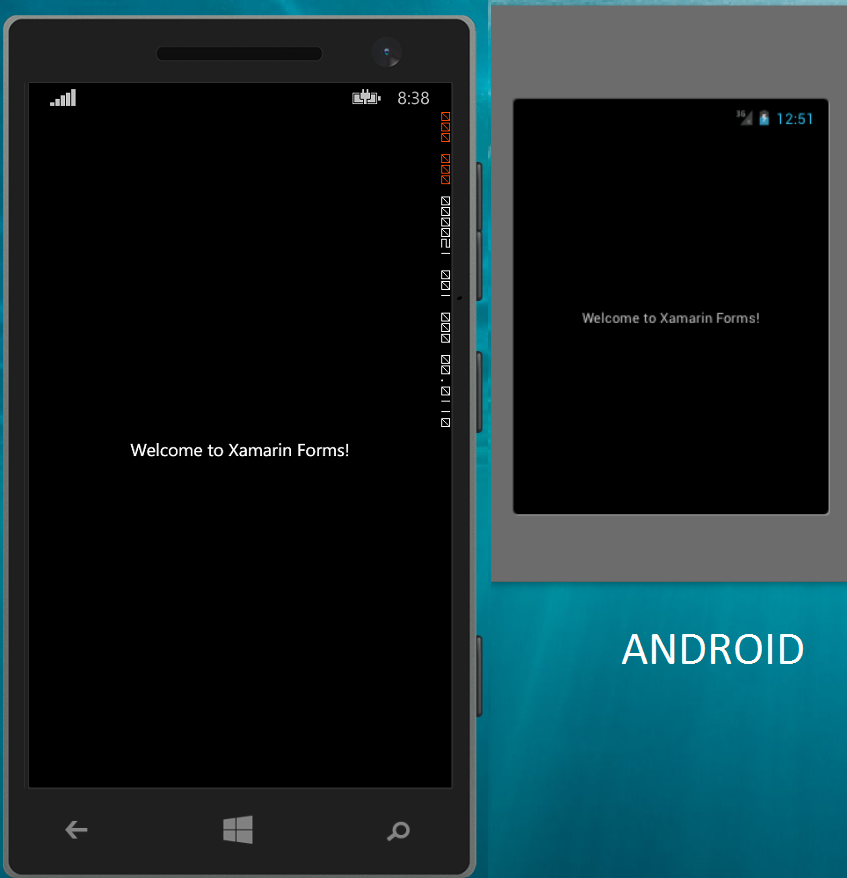
<?xml version="1.0" encoding="utf-8" ?> <pages:PopupPage xmlns="http://xamarin.com/schemas/2014/forms" xmlns:x="http://schemas.microsoft.com/winfx/2009/xaml" xmlns:d="http://xamarin.com/schemas/2014/forms/design" xmlns:mc="http://schemas.openxmlformats.org/markup-compatibility/2006" mc:Ignorable="d" xmlns:pages="clr-namespace:Rg.Plugins.Popup.Pages;assembly=Rg.Plugins.Popup" xmlns:animations="clr-namespace:Rg.Plugins.Popup.Animations;assembly=Rg.Plugins.Popup" x:Class="CustomTabAction.Views.PopupPage"> <pages:PopupPage.Animation> <animations:MoveAnimation PositionIn="Bottom" PositionOut="Bottom" DurationIn="400" DurationOut="300" HasBackgroundAnimation="True"/> </pages:PopupPage.Animation> <StackLayout VerticalOptions="EndAndExpand" HeightRequest="300" BackgroundColor="Red"> <Label Text="I am Awesome BottomSheet as Popup"/> <Label Text="Welcome to Xamarin.Forms!" VerticalOptions="CenterAndExpand" HorizontalOptions="CenterAndExpand" /> </StackLayout> </pages:PopupPage> |
Summary
This was an interesting challenge for our development team, even though after our initial implementation, there were other approaches for the same problem blogged by the awesome Xamarin Community Members.
I am listing few of them here
- Custom Tabs: https://www.sharpnado.com/pure-xamarin-forms-tabs/
- BottomSheet: https://www.heyraviteja.com/post/projects/xamarin-bottom-sheet/
Sample Project with our implementation can be found in my GitHub
https://github.com/muhaym/CustomTabAction
ElegantTabs can be found at https://github.com/muhaym/ElegantTabs, with clear documentation about the capabilities offered by ElegantTabs.
Feel free to contact me in case of doubts, clarification & better solutions and enhancements.
Thanks to our company Fantacode allowing us to invest time in this opensource solution.